J&Mo Design + a Hutch Reno | Sponsored Post

I'm not much for DIYing these days. I want to be Joanna Gaines, but really, I don't have her budget or her time. Work, kids, husbands, responsibility and crap get in the way of playing real life JoJo.

This project, however, I can do. I can take 2 days of feeding my kids Lunchables and fruit snacks with Paw Patrol on repeat to get this kind of thing done.

Here's the funny thing: now that I love my kitchen, we're moving.

Ain't that the way.

Now, if Annie Sloan chalk paint did not exist, this would never have happened. I definitely don't have the time to sit and sand a gigantic hutch down to it's raw wood. This only happened because of blessed Annie Sloan.

This hutch was gifted to me by my brother-in-law. I loved it, but the color was too dark for our kitchen. An easy $70 later and I had paint and wax and 2 whole days to work my magic.


The easiest part was painting. I took my Annie Sloan Paris Grey and did two coats on all surfaces. Waxing took longer, but once I figured out a wax on/wax off technique, she was perfect. All-in-all, this project took about 2 days to complete. I removed the glass doors to make it more open and look more farmhousey, and it is now my favorite place in the house.


The most perfect Welcome sign now sits front and center as people walk into our kitchen. It's handmade, and quite well-made. Clean lines, beautiful wood frame, and it's the perfect touch to welcoming people into our home. You need one. You do. I'm so glad I chose J&Mo Design for this sign because the colors could not be more perfect. And Melanie couldn't have been more wonderful to work with. Thank you for letting me brag on your signs and your beautiful work, Melanie!


Head over to J&Mo Design for all your Eclectic Home Decor needs! Tell Melanie I sent you! And follow her on Instagram for her newest creations!

PinkBlush | Sponsored Post

There is something about a simple black dress that is so feminine and forgiving and sexy and versatile. Dress it up, dress it down. 


This long black dress from PinkBlush is my new favorite. I have worn it no less than three times a week since I got it. It's comfortable, soft material, and I love to throw a black choker on with it. You can grab your own here!


I know you're dying to know: NO. I am not pregnant. Why are you wearing PinkBlush then? Well, I'm glad you asked. Did you know that PinkBlush is now a women's clothing boutique and not just for the pregnant mamas? They are. You're welcome. I'll pause so you can go spend all your money.


Pink Blush also offers fun baby accessories, so you can buy yourself a dress, buy your pregnant sister a dress, AND get something for your new niece or nephew.

Now for the fun stuff! Do you like free stuff? Good! PinkBlush wants to give one of you a $50 gift card to find yourself a fun dress for the holidays! Enter to win below!

This post is sponsored by PinkBlush, however, all opinions are completely my own.

Pecan Pie Tradition

We have multiple traditions around here: Friendsgiving and Dear Abby's Pecan Pie.

Let me start by saying that I used to lie to my Dad every year about this damn pie. Since I was little, Dad made this pie every single Thanksgiving, and every single year, he'd ask me if I had had a piece of it. "Yes...," I would say and turn away. No, I hadn't. It was brown and it looked weird.

At about 16, I stuck my finger in the goo and wound up finishing off half a of pecan pie. At this point, I 'fessed up. Now, sixteen years later, I have stolen the tradition. It is what I bring to Thanksgiving with the family, and now, Friendsgiving.


Without further ado, the recipe from Dear Abby:

INGREDIENTS
unbaked 9-inch pie crust
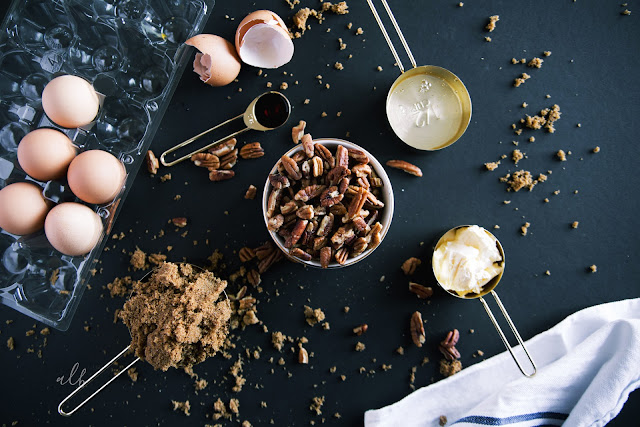
1 cup light corn syrup
1 cup firmly packed dark brown sugar
3 eggs, slightly beaten
1/3 cup butter, melted ( I imagine that margarine can be substituted.)
1/3-1/2 teaspoon salt
1 teaspoon vanilla
1 cup pecan halves

Now, here is where I take the wheel. I like my pie to be heaping, so I do 1 1/2c syrup, 1 1/2 c brown sugar, extra butter because DUH, 1 1/2 tsp vanilla, and nearly 2 cups pecan halves. 


DIRECTIONS
Heat oven to 350 degrees.
In a large bowl, combine corn syrup, sugar, eggs, butter, salt and vanilla; mix well.
Pour filling into unbaked pie crust.
Sprinkle with pecan halves.
Bake for 45- 50 minutes or until center is set. I, typically, have to cover my pie crust with foil to keep it from burning while waiting for the center to set.
(Toothpick inserted in center will come out clean, when pie is done.).
(If crust or pie appears to be getting too brown, cover with foil for the remaining baking time.).
Cool.
You can top it with a bit of whip cream if desired.


No-Sew DIY Starbucks Cup Costume

If you're like me, you buy your Halloween costumes because you have no time to make your kids' costumes. However, when you cannot find a Starbucks cup costume for your child, you will go to great lengths to make it happen.

I don't sew. I don't craft. I do hot glue like a boss.


So, here it is. Making this super fun costume took about an hour minus rushing around when I realized I needed green paper for the straw and trying to find tights.


Supplies:
2 white poster boards
brown craft paper
off-white felt
green paper or poster board
white headband
hot glue


Directions:
1. Take your poster boards and make a large enough cylinder that your child can get it over their head to get in and out of the cup. Then, hot glue those seams.

2. Measure out how wide you'd like your sleeve to be, then be sure to cut your craft paper long enough to wrap all the way around. Hot glue the seam, as well as random dabs to keep it in place.

3. Cut a strip of your felt for straps. I folded these in 3rds and glued as I went.

4. Take your cup, place your child in the cup, and place the straps. Be sure to give them a little wiggle room. Mark where the straps need to go, take child out of cup, glue.

5. You are now ready for the whipped cream ruffles. I made 20- 9 in rounds with a glass bowl and cut. To make your ruffles, take one round, fold it in half and place one dot of glue in center. Fold in half again, another dot of glue. Now you can place your ruffles on the cup. Most of mine went between the two sheets of poster board. Keep the ruffles out of the armpit area. Hot glue. Boom. Whipped cream.


For your headband, take a paper towel roll and glue your green paper around it. Hot glue your straw to the headband. Take your whipped cream rounds and place around the base of the straw, making sure most of them are also glued to the headband to support it.

Finally, print the Starbucks logo and slap it on. I used green vinyl on white scrapbook paper in the CriCut, but printing out the logo will work just fine.


And there you have it! The cutest little costume you ever did see. The compliments on this costume were hilarious. Paired with her twin baristas, I'd say we won Halloween 2016. 
© andrea lebeau. Design by Fearne.